Showing posts with label design. Show all posts

Saturday, June 23, 2018

It's Fairy Day!

Every fairy needs a house, and this one doubles as a teapot cozy!
I have a definite sweet spot in my heart for all things amigurumi (or kawaii softies, if you prefer), and one of my absolute favorites are fairies. International - yes, INTERnational - Fairy Day has been designated for June 24th this year. (Just FYI, the tooth fairy has her own days on February 28th and August 22nd. I don't know why she has two days, but maybe oral health needs the extra advertising!)

I took to Pinterest to find what fairies were available, and there were quite an assortment of delightful little cuties. The ones that are on my bucket list, though, are the ones from the Russian master class crochet. Of course, I would have to work my way up to that level! Perhaps I should start with some of the simpler ones....

Sweet Little Fairy by Fun and Fang; free pattern can be found here

Adorable Tinker Bell by JanaGeek

Who can resist Lucy the Fairy Mouse by LittleAquaGirl?

Unique Bella Fairy by Madelenon - she's waiting to make your wishes come true!
Sublime Fairy Elf by Alyona Dudakova; inspiration only, but you can visit here and here
Chrysanna the Albino Fairy by Epic Kawaii - make sure to check out this designer's other fairies! 

Monday, May 21, 2018

Slight Change of Plans

As much as I love designing crochet items, I just have to give myself one long cold hard look in the mirror and be honest with myself. I love crocheting much more than I like having to write the patterns out. There, I said it. So I have decided to start using OP's patterns and crochet! This doesn't mean I won't ever design anything anymore; it just means that I'll have a "products" section in my store.


Autumn Red Cowl

 First up on this new(er) venture is my version of the Rose Lace Cowl by Alyssa Titus of Undeniable Glitter (free pattern can be found here). This was perfect for me because of all the Caron Simply Soft yarn I have in my stash, and it did take a little over one skein for the cowl (one skein for the body of the cowl and the "little more" for the edging). What a perfect and economical present! The pattern is written well - I didn't have any issues following it at all - and the cowl works up in no time. My only disagreement with her description is that I think this cowl could be very warm and just fine for winter, as well as spring and fall. IMO!


 I did run into one problem, though. My little picot points on the edging all swerved to one side, and I wanted them to point straight. Silly me thought that this would straighten itself out in the blocking, but it didn't. Now don't get me wrong - I'm not blaming the designer. It's very possible that the way I crocheted the points made them swerve - I don't know. Anyway, I took some thread and sewed the top loop of the picots down on the opposite side of the swerve, and this straightened them out. It was a pain, though. So if I ever make this cowl again, I'm going to find  way to crochet those points straight or consider the swerved points part of the design!

Till next time, happy crocheting!


Monday, January 1, 2018

Happy New Year!

Yes, I know the title isn't exactly that original, but I do want to wish all of you a wondrous new year full of all good things - health, fortune, beautiful yarn, and of course crochet! Arthur wishes you a happy new year also, but he enjoyed much merriment and is now in the process of sleeping it off - as I'm sure a certain portion of America is doing, too!

Since my mom reads my blog - Hi Mom! - I couldn't post her Christmas present till now. When visiting last fall, I noticed that her lapghan had really seen better days and needed replacing. My mom has a TV room with olive-colored recliners and a neutral beige/brown couch, and since this room is where she usually uses the lapghan, I wanted to get colors that would coordinate. After returning, I found myself wandering in the yarn section of Walmart and I discovered Lion Brand's Mandala there, and at a great price too! I chose "Chimera", which is a beautiful blend of brown, teal, olive, yellow-olive, gold, orange, and fuschia. I used two skeins and mirror-imaged them. What I love the most about Mandala is that the colors are nicely hued - there, but not too bright - and it's a DK weight, which is fast becoming my favorite. I do wish that it was a little softer, but I guess we can't have everything. I wanted to make her lapghan out of a no-pill acrylic, but fell in love with the Mandala chimera colors - what can I say?


People have asked me about this stitch and I will be making a video to post to YouTube on how to do this. I need to come up with a name (the ones I thought of had been taken) - I think I'll call it the Diamond X Stitch. It's reversible, a little stretchy, and a little squishy.  Oh, yes - Mom loved the lapghan and she especially liked that it was light-weight - go DK yarn!

Thursday, November 30, 2017

Bitten by the Bauble Bug

I've had a cold for the past week, so I've been spending quite a bit of time sailing the internet - and oh! those wonderful holiday patterns. Of all the lovelies that are out there, though, I have become totally enchanted with the Christmas Bauble - and what's not to love? You can get very inexpensive ball ornaments from the dollar store (I bought a package of a dozen for $1) plus you use your yarn scraps to crochet over them, then you have a very pretty ornament when finished. Win-win-win!

I looked up patterns for baubles (hoping to not have to reinvent the wheel), but the majority I found used larger balls and heavier weight yarn. So I had no choice but to create the Corded Bauble - and keeping with the Christmas spirit, I am sharing it with you! I know many of you don't use size 10 or 5 crochet thread, but being a lace-lover I do have quite a bit of these in my stash so that's what I used.
Color variations of the Corded Bauble

Materials - 1 7/8" (48mm) plastic ball ornaments (I had red but gold or silver would fine)
Cotton Crochet Thread size 10 in different colors
Bernat Handicrafter Acrylic Thread size 5 in different colors
Size 1.9mm hook, but you could probably use a 2mm or a 1.8mm
Liquid Stitch or equivalent (white glue would work)
Scissors
Stitches -  sp - Space,  st - Stitch,  sl st - Slip Stitch,  ch - Chain,  dc - Double Crochet,  trc - Triple Crochet,  fptrc - Front Post Triple Crochet,  mc - Magic Circle,  v-st - V-Stitch (dc, ch 1, dc), 2-dc group - 2 dc's worked in same stitch,  FO - finish off.
Special Notes - 1. All rounds are worked from the front (right) side. 2. All rounds are finished off to use a new color for the next round. 3. Instead of trying to weave in ends, I took the beginning and ending tails of each row and weave them so they're next to one another, put Liquid Stitch on the base of each, tied an overhand knot and let them dry.
1. With a mc, ch 3 (1st dc) and work 11 dc's in the circle. Sl St in top of ch 3, tighten circle and FO. (12 dcs).

2. Work 2 dc's in between each dc from round 1. FO. (12 2-dc groups made)

3. Work 1 V-st in the middle of each 2-dc group from round 2. FO. (12 V-sts)

4. *Work 2-dc group in V-st from round 3; trc in front of round 3, in between the 2-dc groups from round 2*. Repeat * to * around. FO.

5. Work V-st between each 2-dc group from round 4. FO.

6. *Work V-st in the ch 1 sp of the V-st from round 5; working in front of round 5, fptrc around the trc from round 4*. Repeat * to * around. FO.

7. Work V-st in the ch 1 sp of V-st from round 6. FO.

8. *Work V-st in the ch 1 sp of the V-st from round 7; working in front of round 7, fptrc around the fptrc from round 6*. Repeat * to * around. FO.

9. Work V-st in the ch 1 sp of V-st from round 8. Slip ball into crochet and finish round with ball inside. You'll work crochet rounds over ball from this point on.

10. *Work V-st in the ch 1 sp of the V-st from round 9; working in front of round 9, fptrc around the fptrc from round 8*. Repeat * to * around. FO.

11. Work 2-dc group in ch 1 sp from round 10 around. FO.

12. *Work 1 dc between the 2-dc group from round 11; working in front of round 11, fptrc around the fptrc from round 10*. Repeat * to * around. FO.

13. Work sc in every other st around, FO.


Note - If you use all size 10 crochet thread, you may need to add another round before you complete the bauble with round 13. If so, work 1 front post double crochet in every fptrc from round 12.

A couple other baubles I made. Loved the look of the Fptrc stitch, so I went crazy with it!
The entire dozen baubles completed!

I hope you enjoyed this little tutorial and it has encouraged you to create a few baubles of your own this season!




Saturday, September 9, 2017

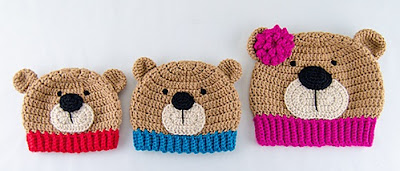
It's National Teddy Bear Day!

We love teddy bears. I don't believe I have ever known someone who didn't at least like teddies, and many people had one as a "best friend" as a child (me included!). Ever since the shopkeeper Morris Michtom and his wife Rose made a stuffed fabric bear in honor of America’s 26th commander-in-chief (Teddy Roosevelt) and displayed it with a sign, “Teddy’s bear,” in their store window, these bears have been a perennial favorite. So in honor of this beloved creature that has given us so much comfort, let the love begin!
Have you ever seen such a sweet face?!!

Gorgeous free-form teddy by Irina Iriss, at
What a delightful way to stay warm! Pattern for sale by Carolina Guzman at

Such little cuties! Free pattern available at https://amigurumi.today/amigurumi-teddy-bear-brothers-in-sweaters-free-crochet-pattern/                        
Fuzzy Wuzzy was a bear...and the free pattern is

Aren't these booties adorable? Free pattern from Helena Asmu Lim at http://www.clearlyhelena.com/teddy-bear-booties/


Sweetness overload!

What child wouldn't go to sleep with these friends? By Christins from Sweet Potato 3 at

My childhood teddy was a panda bear! Designed by

What lucky mother wouldn't want to receive this beauty for her newborn?Teddy

There's even a Halloween Teddy - Frankie the Zombie Teddy by Krawka at
                                                                                                                            
(I have to admit that there were so many teddies and teddy-related items that it was really difficult to decide what to include in this post. Trust me, this is only a fraction of what I found on Pinterest!)

Sunday, May 14, 2017

Mother's Day Flop

About a month ago I found a beautiful Ice yarn, Air Baby Alpaca. It's a mix of alpaca, extrafine merino wool, viscose, and polyamide, and it's so soft. It has been made into a chain, and since I've enjoyed working with other chained yarns, I decided to try it. Plus it came in a very pretty shell pink (pink with an undertone of peach) that would look really good on my mom. 

I wanted to make a shawlette for my mom - just a little something to go over her shoulders without being cumbersome or heavy. I found the Dawn in the Woods Shawl by Elaine Phillips (http://www.ravelry.com/patterns/library/dawn-in-the-woods-shawl) which was perfect because the length.can be adjusted. I was set!
While I was working on the last third of the shawlette I realized that it wasn't going to be symmetrical. This bothered my sense of design balance (possibly a little OCD?) but my real problem was that when I tried it on it really looked "old lady-ish". My mom's style is more like Olivia's in 'Scandal', not the Victorian lacy look, so I came to the realization this would be all wrong for her. I have come up with a Plan B, but this will have to be for her birthday because I ran out of time for Mother's Day! Amazingly (or maybe not), the shawl ended up looking MUCH better on the dress form - 


So instead of this shawlette, I decided to fall back on an old standby - pigs. My mom has a wonderful collection, mostly figurines, and told the family years ago to not give her any more pigs. I have chosen to completely ignore this directive. Hence, behold the sweet little piggy bookmark (pattern from Ashlea Konecny at http://www.ravelry.com/patterns/library/pig-bookmark) - 
                                                         
    
 I also found a very unique present at Faerie Magazine that I thought my mom would like - Flying Prayer/Wish Paper (https://www.faeriemag.com/products/flying-wish-paper-mini-wishing-kit-dandelion-prayer). You write your wish on the paper, roll it up, put it on the platform card, and light it on fire. At the last moment "your wish magically lifts off the platform and rises to the heavens!". How cool is that!

Happy Mother's Day, Mom - And to all of those wonderful mothers out there! We deserve it!

Monday, May 1, 2017

A Lacy Tribute to Mother's Day


As I'm sure with many of you, I've had Mother's Day on my mind. It's only a couple weeks away and I'm in the middle of making something for my mom (with luck it'll be done in time!). Of course, I can't show or discuss what I'm making because my Mom reads this blog and I wouldn't want to give away the surprise. So that will have to wait for later. (Hi, Mom!)

The following are a gathering of what I would consider wonderful Mother's Day presents - of the lacy variety, of course!

I love this bowl - it looks just like a crown! http://meninascrocheteirasemacao.blogspot.fr/2015/03/receitas-e-graficos-de-croche-endurecido.html (Many charts available at this site)    
Every mom loves a heart box! http://crochetmuestras.blogspot.com.ar/2012/09/ideas-y-modelos-para-hacer-cajas-crochet.html (Inspiration only, darn it!)
Elegant statement necklace/collar from http://www.silviagramani.com/search/label/Colar%20de%20P%C3%A9rolas (Patterns for purchase through designer's books)
Have a gorgeous doily already made? Frame it! http://crochet.postbit.com/photos/crochet-doilies/86620_1.html
Lovely tealight holder from http://www.soulouposeto.gr/2013/11/blog-post_5.html (No pattern but instruction on stiffening)
Who couldn't use a pretty purse like this? http://clubmasteric.ru/shemi-vasanie-kruchkom/sumki-kruchkom/1035-letnja-sumochka-kruchkom.html
Beautifully ethereal! http://meninascrocheteirasemacao.blogspot.fr/2015/03/receitas-e-graficos-de-croche-endurecido.html
Such a pretty candy dish - or for sparkly trinkets in the boudoir?  http://lanaecotone.blogspot.com/2010/05/scatolina-alluncinetto.html?spref=pi
You can find the pattern for the featured picture of 'Mother's Day Teacup' by Marjorie Jones at http://www.ravelry.com/patterns/library/mothers-day-teacup. Now it's back to present making for me....

Thursday, March 30, 2017

The "Simple" Scarf

A little while ago I spotted a crescent-shaped scarf/shawl and fell in love; ever since I have been chomping at the bit to design one. This couldn't be all that difficult, could it? Little did I realize what I was getting myself into!

This adventure began at the beginning of March. I decided that I wanted to have a curved ridge to mimic the crescent shape and to give it a more modern look. Then, since I have also fallen in love with gradient color schemes, I chose to use Michael's Loops & Thread Woolike yarn in ivory, beige, and cool gray with just one row of charcoal to strongly define the edge. Seemed like a plan to me. Ha!

Gradient Color Bands
 

I am now on the third version of this scarf. (Amazingly, the yarn did hold up to all my frogging.) At first I tried to figure this out by myself and failed miserably. Then I found a free crescent pattern to give me some guidance, but after a few rows I didn't like the extreme "U" shape it was taking, so that was frogged. Then I tried my own version, but that turned out too straight. Finally I came up with what I have now, and I think it's going to be all right. Up to this point my designs have been very simple, so I just wasn't ready for one to give me such a fight!

There are still two problems, though. 1) It seems that when you start a crescent shaped scarf with a short neck row, you end up with a separately curved neckline from the body of the scarf (see photo below). This has happened to me three times now. I've seen a video where this was mentioned, but I also saw a photo of a full crescent shawl without this problem, so I'm not sure if it's just me or not. I am hoping that I can correct this with an inside edging of some sort. 2) I wasn't thinking clearly enough to realize that on some row ends I had three stitches and some I had four. The four makes a little bump-out that I don't want (see top of photo below). I can easily correct this in the written pattern, but I am hoping again that I can correct this with the inside edging of some sort.  (Insert deleted expletive of your choice here.)

Wonky neckline and end of row bumps

I have one or possibly two more sets of the three-color bands to go, and then to come up with my miracle edging. But I won't give up on the scarf/shawlette after this one is done, because I saw such wonderful designs while researching this project that I'll just have to keep on going!

P.S. - If anyone knows of a solution to the wonky neckline, PLEASE let me know. I will be forever in your debt.