Showing posts with label crochet pattern. Show all posts

Sunday, February 10, 2019

Chain8Designs

In my last post I discussed my attempt at trying to be more organized with my blog posts by coming up with categories. When I can, I'd like to showcase a designer that I found while perusing the internet that I think is really good and that you will enjoy, if you aren't aware of her/him already. Today I would like to introduce you to Jennifer at Chain8Designs.
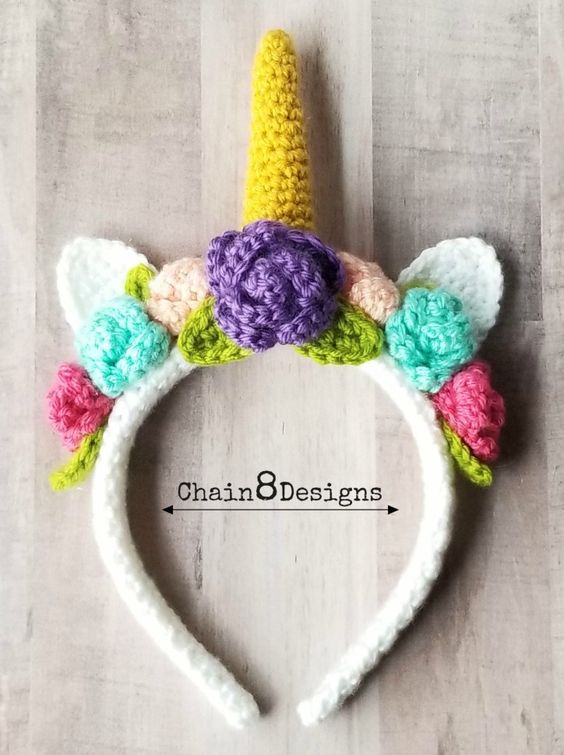
Unicorn headband
I belong to an email group called Bloglovin', where you can sign up to receive posts from blogs you wish to follow - and they usually throw in a few more they think you might like. This Magical Unicorn headband design showed up in my feed, so of course I had to find out about the designer.

She doesn't have a large assortment of designs (but then, neither do I!), but what she does have is wonderful. Jennifer also has Holiday Mouse and Festive Reindeer headbands, plus a fantastic Twitterpated Heart Beanie just in time for Valentines Day! And best of all - her patterns are free! So hurry and get over to see her work right now. You can also follow her on Instagram, facebook, and Pinterest. BTW, Jennifer's pinterest boards are terrific, so make sure to check those out too.

I hope you enjoy Jennifer's work as much as I do, and, as always - Happy Crocheting!

Friday, December 21, 2018

One Resolution Completed!

Yes, after many years I have FINALLY completed one of my New Year's resolutions. This has nothing to do with crochet (register astonishment here), but it was a Martha Stewart Christmas craft project from at least 2008, if not before. Yes, I am talking about none other than Fabric Balls!


Many moons ago Martha Stewart would have a half-hour craft show in the afternoon, and I loved it! (Some people do yoga, some meditate; I watch Martha.) I saw the program showing how to do the fabric balls and I was hooked. So I went out and bought the styrofoam balls - smooth ones are best, fabric - stretchy works best, and wonderfully elaborate ribbon. Then I became distracted with life...for a long time. However, I lovingly packed up the materials and promised myself I'd get to them some day.

My husband and I don't give presents to extended family, but I began making ornaments to give away. A couple years ago I made one of Oombawka Design's angels (free pattern here), and last year I made crochet baubles (free pattern here). But this year I steeled my determination and tackled the fabric balls.

Of course it wasn't nearly as easy as I thought it would be. The main issue was that the template to cut out the fabric didn't print out to the correct size, so there was quite a bit of adjustment to do. If you read the comments you'll find I wasn't the only one with this problem. The second issue was what to cover the ribbon ends with. I chose to order end caps and then flattened them with a hammer - you need at least 14 to 15 mm to cover and mine were a little small; or you could follow the suggestions given on the website.


All in all, I'm pretty happy with how these turned out - I just hope the people receiving them feel the same way!

Wednesday, October 10, 2018

I'm Baaack!

Yes, I know. I kind of fell off the map for awhile, but before I go visit my Mom for her 92nd birthday, I felt I should throw a post together - just to make sure you all don't think I've retired to some remote island somewhere. So, this is what I've been up to during my posting absence


 As you might recall, my nephew's wife is due in December (a girl!) and this is what I will be gifting her with at the shower this Saturday. The Unicorn Lovey I designed myself and the pattern is now available in my shop. The booties pattern still eludes me - sorry. The sweater is a free pattern offered by Caron Simply Soft yarn here. Lilleliis' doll pattern is sold here, but I did add the crocheted heart applique based on Pink Milk's free pattern. The baby blanket is based on the pattern by Debra O'Leary Patterns, Arielle's Square, available for purchase here. The edging is different than her pattern - row 1 - sc around; row 2 - *hdc, skip one sc, ch 1, hdc in next sc*, repeat * to * around; and the bobble edge is *sl st in next st, sl st in next st, 3 dc's in next st*, repeat * to * around. A simple but cute border, even if I do say so myself. And you could weave a ribbon in the hdc row if you wanted. The squares were whip-stitched together.

 I am still totally in love with Lilleliis' Cuddly Baby Amigurumi doll. The one on the right is being given away and I'll list the middle one for sale in my shop. The one on the left is the first one I made. He has button eyes and a button heart on his chest, so he wouldn't be any good for a baby/toddler. I think I may just have to keep him for myself!


I love doilies but really don't have much of a use for them. I do like the idea of framing them or attaching them to hoops for decoration, though. This Wispweave pattern by Julia Hart really caught my eye, so of course I had to try my hand at it. She has much better lighting in her photos to show off the textural stitches, so go take a look at her post. Above is my version. I plan to try this in multi-colors - this could make a great base to a dream catcher. It is an intricate pattern and a little fiddly, but well worth it

.
In trying to keep with my resolution to use up my stash, I have delved into my collection of Loops and Threads Woolike yarn and began this cowl. It has been inspired by the very lovely and economical Botanica Cowl Kit being offered by Willow Yarns (anyone say "Christmas"?). I love the little "bobble-ish" texture my cowl is taking on, and I'm very happy with the colors. Plus, since Woolike is a fingering yarn, the weight of this cowl is perfect for the mild California winters.

Well, I hope this proves that even though I may be very behind in my blog posts, I certainly keep moving forward with my crochet projects. I hope everyone has a great Halloween, and I'll see you in November. Till then, happy crocheting!


Friday, July 13, 2018

I've Been Busy

I have totally fallen off the track with posting as I had promised myself at New Year's. I went to a wonderful 4th of July/family reunion party and had a great time, but within a couple days the weather went to 112 degrees and I didn't handle it well. (Neither did several of my plants, and I am afraid I've lost at least two of them.) Then last Tuesday my husband went in for surgery (all is well!), but I had to get up at 3:30 am to get ready to leave with him, which really threw my routine in a tizzy. Silly me, I brought a shawl to work on while I was waiting, but I was so tired I ended up having to rip out all that I had done. Oh well, it kept me busy. I've since caught up on my sleep and I am back with the living now!

My husband was just recently notified that his family is going to have a new addition. The nephew and his wife had a gender reveal at the July 4th party - it's a girl! So if course that means anything I was currently working on or planning to work on has been set aside for now. There are so many wonderful things to crochet for babies - it's so hard to choose! However, I remembered a particular doll that I had seen a while ago that I fell in love with, but it was a paid pattern so I took a pass. But now I have the perfect excuse for buying it! So I did. It's called "Cuddle-baby - amigurumi doll" by Lilleliis and it cost about $4.68 in US dollars (4 Euros). The pattern is well written and easy to follow; it was me who screwed up, so of course it took forever to make.

Cuddle-Baby - Amigurumi by Lilleliis

My suggestion is to make sure you have all the same weight yarn to make this doll with. I thought I did, but it didn't take me too long to realize I didn't. You see, I'm still trying to keep with using my stash, so I worked with what I had. I started with the head and then went on to the body. The yarn I used for the head was at least a DK and the body was definitely sport weight. The head was huge! So I had to unravel half the head and figure out how to make it smaller, which was time consuming. Then I realized I hadn't worked the invisible decrease correctly on the body, which left odd little indents (they didn't show until I stuffed it). I tried to fix it with a needle and thread, but it didn't work. So I had to redo the body. Then I realized one of the hands was bigger than the other, but I was able to fix that with needle and thread. Geez, you'd think I was a novice crocheter for as much as I messed up!

I did decide to embellish a little, so I gave the hat a crab stitch edging with a pink whipstitch in between the grey stitches, and I added a triple heart applique to the body. Even though this little doll ended up taking a lot more time that it should have, I'm still happy with the outcome. I may add the stitching around the wrists and ankles, though - it does give a more finished look. That is, of course, if I can keep myself from starting the newborn booties, baby blanket, 12M sweater...well, you get the idea!

My version - not a bad runner up, hey?  

There is one thing I found out that made me sad, though. While I was looking for the pattern on Ravelry, I found another person's version of the same pattern for sale. It wasn't done nearly as well, and now I can't seem to find it. I can only hope that the original designer found it and told her to take it down. The nerve of some people! Another person was trying to crochet this doll from the picture (hadn't bought the pattern) but was having problems figuring out the arms and legs, so she was asking for the directions on the pattern's forum! The designer replied that what she was requesting was illegal and she was shocked that someone could do such a thing. Listen, I've made things from photos, too, but  I would never have the gall to go on the paid pattern's site and ask for free directions! So sad this stuff goes on. And one word to the wise - unless a pattern is VERY simple, you're going to spend A LOT of time figuring it out on your own. Trust me - I know! So you'd better think twice if it's really worth saving a few bucks, IMO.

Till next time, keep on hookin'!


Saturday, June 23, 2018

It's Fairy Day!

Every fairy needs a house, and this one doubles as a teapot cozy!
I have a definite sweet spot in my heart for all things amigurumi (or kawaii softies, if you prefer), and one of my absolute favorites are fairies. International - yes, INTERnational - Fairy Day has been designated for June 24th this year. (Just FYI, the tooth fairy has her own days on February 28th and August 22nd. I don't know why she has two days, but maybe oral health needs the extra advertising!)

I took to Pinterest to find what fairies were available, and there were quite an assortment of delightful little cuties. The ones that are on my bucket list, though, are the ones from the Russian master class crochet. Of course, I would have to work my way up to that level! Perhaps I should start with some of the simpler ones....

Sweet Little Fairy by Fun and Fang; free pattern can be found here

Adorable Tinker Bell by JanaGeek

Who can resist Lucy the Fairy Mouse by LittleAquaGirl?

Unique Bella Fairy by Madelenon - she's waiting to make your wishes come true!
Sublime Fairy Elf by Alyona Dudakova; inspiration only, but you can visit here and here
Chrysanna the Albino Fairy by Epic Kawaii - make sure to check out this designer's other fairies! 

Monday, May 21, 2018

Slight Change of Plans

As much as I love designing crochet items, I just have to give myself one long cold hard look in the mirror and be honest with myself. I love crocheting much more than I like having to write the patterns out. There, I said it. So I have decided to start using OP's patterns and crochet! This doesn't mean I won't ever design anything anymore; it just means that I'll have a "products" section in my store.


Autumn Red Cowl

 First up on this new(er) venture is my version of the Rose Lace Cowl by Alyssa Titus of Undeniable Glitter (free pattern can be found here). This was perfect for me because of all the Caron Simply Soft yarn I have in my stash, and it did take a little over one skein for the cowl (one skein for the body of the cowl and the "little more" for the edging). What a perfect and economical present! The pattern is written well - I didn't have any issues following it at all - and the cowl works up in no time. My only disagreement with her description is that I think this cowl could be very warm and just fine for winter, as well as spring and fall. IMO!


 I did run into one problem, though. My little picot points on the edging all swerved to one side, and I wanted them to point straight. Silly me thought that this would straighten itself out in the blocking, but it didn't. Now don't get me wrong - I'm not blaming the designer. It's very possible that the way I crocheted the points made them swerve - I don't know. Anyway, I took some thread and sewed the top loop of the picots down on the opposite side of the swerve, and this straightened them out. It was a pain, though. So if I ever make this cowl again, I'm going to find  way to crochet those points straight or consider the swerved points part of the design!

Till next time, happy crocheting!


Saturday, May 12, 2018

Happy Mother's Day!

Happy Mother's Day to all mothers, including mothers-to-be, mothers to fur-babies, and mothers in spirit! I believe most women have a nurturing aspect to their personalities, and I like to take Mother's Day to celebrate this. I know this is a rather broad definition of this holiday, but I think the world would be a very different place without the caring  of women. So I hope all of you have a wonderful day!
I won't be able to spend Mother's Day with my Mom, but of course we'll talk and I sent her a card with a little contribution to her pig collection. I took the Little Crochet Bunny Pattern from Amigurumi Today.com and did a few tweaks to the pattern to create the girly-girl piglet for my mom.


The little dress is technically removable. I tried using tiny snaps but it didn't look right, so I just sewed the pearls to the dress. Looking at the dress now I realize I should've blocked it, especially the hemline. Oh, well. I'm sure my mom will excuse me. Other than that faux-pah, I was really happy with how she turned out.

Till next time, have a great day and happy crocheting!

Friday, May 4, 2018

It's About Time!

I've been a little sluggish with my crocheting lately (and my posts!). I needed to take some pics too, and of course "sunny" California decided to be grey and drizzly for the past few days. However - TA DA - I have a few new things to show you. One item isn't totally new, but I've finally completed it and have the pattern available now in my store, which you can find here. This is the afghan I mentioned in an earlier post, and I've named it Aqua Dreams. The Caron Simply Soft yarn is so pretty and the sheen is really nice. I was very angry at myself for making my traditional mistake of crocheting the beginning rows loose and tightening my tension as I go along - yes, I did it again - but I was able to work it all out with the single crochet/crab stitch border, so everything is fine now. And I am very proud of myself for using up an additional 10+ skeins of my stash!

Aqua Dreams Afghan


 I was so happy with the way the Caron yarn looked that I decided to make another item with it - a long cowl with a lacy edging that you can double loop for added warmth. That's still on the blocking mat, so you'll get to see it in my next post.  I've also finished my version of the Metro Kerchief by Yuliya Tkacheva. I didn't design these two items, so they'll be going in my store as 'products for sale', a new category I'll be adding shortly. I've also designed a scarf/shawlette, I'm working on a summer cowl, and I've finished my mom's Mother's Day present, but I'll have more on those later. By George, i think I'm out of my slump!

My version of the Metro Kerchief
     Till next time, happy crocheting!                                

Wednesday, April 4, 2018

I've Been So Bad...

Well, I certainly hope that all of you had a wonderful Easter and didn't go overboard on the sweets, like I did! I had plans of showing gorgeous carved eggs (that you can see here), or at the very least sharing a cute GIF (which can be seen here). Somehow those never came to fruition. I think I've been stuck in some kind of slow-motion gear that I can't seem to get out of. However, I did get into the Easter spirit and decided to try out a pattern that I fell in love with some time ago. It's the sweet "Little crochet bunny pattern" from Amigurumi Today (available for free here).

Little crochet bunny from Amigurumi Today 


I do have yarn appropriate for making this, but I ran into a problem. The yarn is fuzzy and I was having great difficulty seeing the stitches. So I decided to switch to another yarn I have - sock weight without all the fuzz. Even though my version isn't quite as cute as the original, I still think it turned out ok. Mine just looks a bit sleepy!

 Arthur took pity on my Sleepy Bunny and shared one of his heart pillows with her, originally seen here. I decided that Arthur shouldn't have to sit on a box anymore, so I ordered a comfy retro-modern chair for him. However, I need to find a way to wire him, because Arthur has a terrible problem with falling apart. (The chair, while being very stylish, won't give him a lot of support.) I did find a site that showed how to make an "upholstered" chair and I think Arthur would be ecstatic if I could make one of those for him - but crocheted, of course. Perhaps this will be my next project? But only after I finish the current WIPs.....

Monday, March 12, 2018

Easter is Coming...

I always seem to be "a day late and a dollar short" when it comes to holiday themed posts. I know that St. Patrick's Day is on March 17th, but I think I'm going to take a pass this year for posting wondrous Irish things. If you have an insatiable desire to see these lace beauties, please refer to a previous post of mine here.
Lately I've been working on an afghan that's almost complete (yes, really!) and the Metro Kerchief by Yuliya Tkacheva (see pic below). I love the design of this kerchief, although if you make it slightly larger it would really be a shawlette, and I'm about halfway done. I know, I know - I'm supposed to be designing my own items - but sometimes it's nice just to go with someone else's pattern. If I don't find someone to give this to I'll probably just list it in my shop.

Metro Kerchief by Yuliya Tkacheva


 But I digress. Easter is coming, and I think I've been looking at this adorable bunny for so long that I must make her. There is no designer listed that I can find, but the free pattern is available at Amigurumi Today. If you are a Pinterest Peruser, I'm sure you've come across her - along with a million other items we all would like to make. Well, enough with the talking. I've got the yarn - I've got the hook - now wish me luck!


 PS. I want the pattern for that little bear, too!

Friday, March 2, 2018

Pretty in Pink

I'm late.  As some of you that follow me may have noticed, I have done several blog posts using a "national day" as a theme. Well, March 1st was National Pig Day and I missed it. The reason this is a big deal is that my mom loves pigs (Hi, Mom!) and has a wonderful collection of them. They're mostly ceramic figurines, but she has a few other items too - like the iron flying pig doorstop or the pig-weighing-herself salt and pepper shaker, for example. Quite a while ago now my mom told all of us not to give her anymore pigs because she felt she had more than enough. I don't always abide by that wish, but I'm sure she'll find this "ode to the pig" blog post quite acceptable!

Baby pig found on Pinterest - inspiration only, darn it!

Pig Amigurumi CAL by Brenna Eaves

Adorable key ring by Duls Stuff, inspiration only

Clown pig - inspiration only

Willie the Pig by Lan Lien, free pattern

Sweet Pig Lovey by Maiko

Friends from Instagram, inspiration

Pippa Pig by Little Aqua Girl
Pig bookmark I gave my mom, pattern from Ashlea of HeartHookHome

No post about pigs would be complete without Piglet! Free pattern from Holly's Hobbies

 Hope you all had a wonderful National Pig Day, and celebrated it by enjoying our porcine friends in whatever way you deemed appropriate!

Wednesday, January 31, 2018

Whorled Crochet Hook Organizer

While perusing the internet, I saw the concept of using a crochet-covered can for a hook holder/organizer and I thought I'd give it a "whirl" (sorry, I couldn't resist!). Anyway, I decided on a spiral design so that a person could put their smaller hooks near the middle and work outward as the hook sizes increase. For the can I just used a regular vegetable can, about 14.5 - 15.5 ounce size, cleaned with label removed. I used scrap sport weight yarn (although the pink had to be doubled) with an E hook. The nice thing about this design is that you could use a smaller or larger can, just make the initial spiral smaller or larger to fit the opening; the rest of the pattern would stay the same. I've always been in favor of flexible patterns, when possible! So without further ado, here is the pattern -

Whorled Crochet Hook Organizer  -  Skill level: Easy

Materials -
Vegetable can, cleaned and label removed
Scraps of sport-weight yarn (colors called A, B, and C)
Size E (3.5mm) crochet hook

Pattern -  Worked in the round with front side facing you at all times.

1. With A, create a magic circle, ch 1. In the circle work 1 sc, 1 hdc, and 2 dc. Do not finish off.

2. With B, attach yarn to circle and work 1 sc, 1 hdc, and 2 dc. Do not finish off. Repeat with C.

                                   Instructions 1 and 2. Yarns knotted on right side are just the tails.
3. Tighten magic circle. With A, work 2 dc in each stitch of color B. With B, work 2 dc in each stitch of color C. With C, work 2 dc in each stitch of color A (8 dc of each color). You will continue to work the colors over one another till the end of the crochet piece.

                                   Progression of spiral

4. Continue working 2 dc in each stitch until you have a total of 14 dc of each color.

5. Work 1 dc in each of the next 15 stitches with each color.

                                  Spiral after Instruction 5.

6. Now begin working 1 hdc in each stitch around with each color. You won't do any increases from this point on; this is the part of the crochet that will slip over the sides of the can - it will fit snug.

                                   Hdc's fitting over side of can.

                                           Crochet over can.

7. Continue working the hdc spiral until it just comes over the edge of the bottom of the can. Finish off two of the colors. Leaving a long tail with the third color, whip-stitch around each hdc and pull to tighten every few stitches. The piece should fit tautly over the can; finish off.


                                  Instruction 7 completed.


 8. Ta-Da!


                                               Fini!

Just a couple more thoughts. If you want to make sure your hooks stay upright, putting some scrap yarn in the can to act as a cage style of "frog" device could work well.  Also, this pattern won't work with hooks that have comfort grip handles (Clover, etc.) or even smaller thumb-hold type padding because 1) the spaces in the crochet aren't large enough to accommodate the extra bulk, and 2) the hooks don't slide in/out well because the padding hangs up on the yarn. But if you're like me and have a bunch of the good 'ol aluminum hooks, this is the organizer for you!

Thursday, November 30, 2017

Bitten by the Bauble Bug

I've had a cold for the past week, so I've been spending quite a bit of time sailing the internet - and oh! those wonderful holiday patterns. Of all the lovelies that are out there, though, I have become totally enchanted with the Christmas Bauble - and what's not to love? You can get very inexpensive ball ornaments from the dollar store (I bought a package of a dozen for $1) plus you use your yarn scraps to crochet over them, then you have a very pretty ornament when finished. Win-win-win!

I looked up patterns for baubles (hoping to not have to reinvent the wheel), but the majority I found used larger balls and heavier weight yarn. So I had no choice but to create the Corded Bauble - and keeping with the Christmas spirit, I am sharing it with you! I know many of you don't use size 10 or 5 crochet thread, but being a lace-lover I do have quite a bit of these in my stash so that's what I used.
Color variations of the Corded Bauble

Materials - 1 7/8" (48mm) plastic ball ornaments (I had red but gold or silver would fine)
Cotton Crochet Thread size 10 in different colors
Bernat Handicrafter Acrylic Thread size 5 in different colors
Size 1.9mm hook, but you could probably use a 2mm or a 1.8mm
Liquid Stitch or equivalent (white glue would work)
Scissors
Stitches -  sp - Space,  st - Stitch,  sl st - Slip Stitch,  ch - Chain,  dc - Double Crochet,  trc - Triple Crochet,  fptrc - Front Post Triple Crochet,  mc - Magic Circle,  v-st - V-Stitch (dc, ch 1, dc), 2-dc group - 2 dc's worked in same stitch,  FO - finish off.
Special Notes - 1. All rounds are worked from the front (right) side. 2. All rounds are finished off to use a new color for the next round. 3. Instead of trying to weave in ends, I took the beginning and ending tails of each row and weave them so they're next to one another, put Liquid Stitch on the base of each, tied an overhand knot and let them dry.
1. With a mc, ch 3 (1st dc) and work 11 dc's in the circle. Sl St in top of ch 3, tighten circle and FO. (12 dcs).

2. Work 2 dc's in between each dc from round 1. FO. (12 2-dc groups made)

3. Work 1 V-st in the middle of each 2-dc group from round 2. FO. (12 V-sts)

4. *Work 2-dc group in V-st from round 3; trc in front of round 3, in between the 2-dc groups from round 2*. Repeat * to * around. FO.

5. Work V-st between each 2-dc group from round 4. FO.

6. *Work V-st in the ch 1 sp of the V-st from round 5; working in front of round 5, fptrc around the trc from round 4*. Repeat * to * around. FO.

7. Work V-st in the ch 1 sp of V-st from round 6. FO.

8. *Work V-st in the ch 1 sp of the V-st from round 7; working in front of round 7, fptrc around the fptrc from round 6*. Repeat * to * around. FO.

9. Work V-st in the ch 1 sp of V-st from round 8. Slip ball into crochet and finish round with ball inside. You'll work crochet rounds over ball from this point on.

10. *Work V-st in the ch 1 sp of the V-st from round 9; working in front of round 9, fptrc around the fptrc from round 8*. Repeat * to * around. FO.

11. Work 2-dc group in ch 1 sp from round 10 around. FO.

12. *Work 1 dc between the 2-dc group from round 11; working in front of round 11, fptrc around the fptrc from round 10*. Repeat * to * around. FO.

13. Work sc in every other st around, FO.


Note - If you use all size 10 crochet thread, you may need to add another round before you complete the bauble with round 13. If so, work 1 front post double crochet in every fptrc from round 12.

A couple other baubles I made. Loved the look of the Fptrc stitch, so I went crazy with it!
The entire dozen baubles completed!

I hope you enjoyed this little tutorial and it has encouraged you to create a few baubles of your own this season!